How to Style an Atom Feed with XSLT
Create a seamless user experience for your Atom or RSS feed with XLST stylesheets.
Maybe it’s nostalgia for the early web, but I love web feeds as a tool for following and reading content. Feeds are privacy-first and put the reader in control: you can opt out any time, choose your tool for reading, and organize them in any way you want.
But the UX experience is terrible.
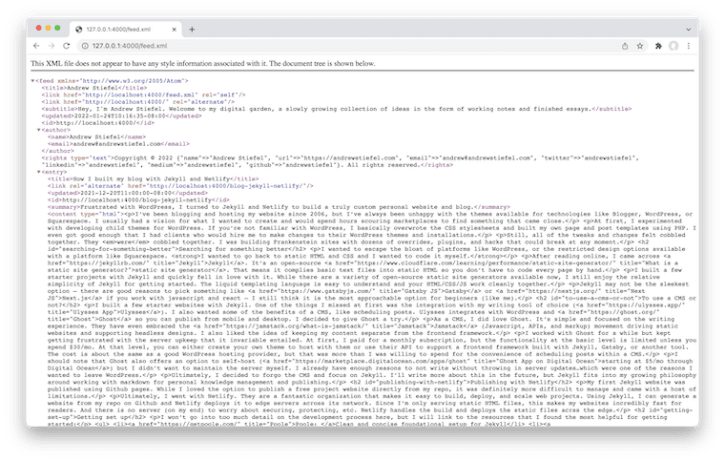
Web feeds are meant to be machine-readable, so most users follow a link to an RSS or Atom feed and end up looking at something like this:

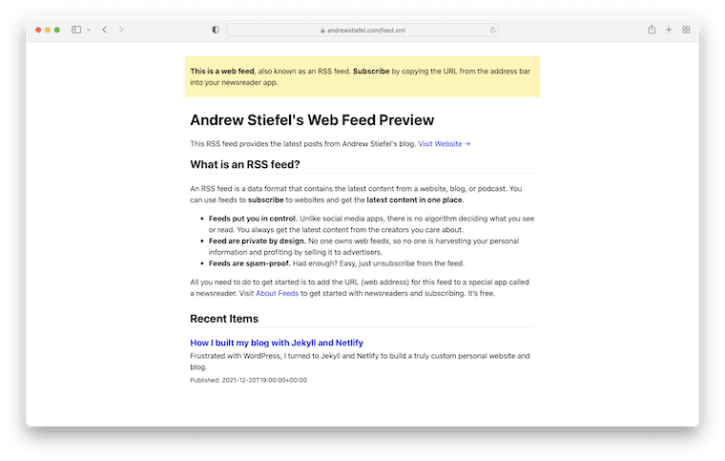
This doesn’t have to be the case. RSS and Atom feeds can be human-readable with a little extra work. Here’s an example from my website. It’s simple and clean and provides some essential instructions on how to get started:

Let’s explore how to implement this with Atom and an XSLT stylesheet.
Why Atom, and not RSS?
Great question, and one I don’t intend to answer fully here given the vast amounts of writing on this topic already. In short, Atom is a better format.
Specifically, I wanted the following:
- Support for a full content payload in the feed
- Wide support across feed readers
- Extensibility and future-proof format
First, create the feed in Jekyll
If you’re using a different tech stack to create your website, you can skip this section and jump ahead to the part about creating an XSLT stylesheet.
You can either use the excellent Jekyll Feed plugin, or create your own template using liquid tags and save it in your project as feed.xml.
I chose to create my own template, so I could incorporate some additional markup. You can see my version below:
---
---

<?xml version="1.0" encoding="utf-8"?>
<?xml-stylesheet href="/assets/css/feed.xsl" type="text/xsl"?>
<feed xmlns="http://www.w3.org/2005/Atom">

 <title>{{ site.title }}</title>
 <link href="{{ site.url }}{{ site.baseurl }}/feed.xml" rel="self"/>
 <link href="{{ site.url }}{{ site.baseurl }}/" rel="alternate"/>
 <subtitle>{{ site.description }}</subtitle>
 <updated>{{ site.time | date_to_xmlschema }}</updated>
 <id>{{ site.url }}/</id>
 <author>
   <name>{{ site.author.name }}</name>
   <email>{{ site.author.email }}</email>
 </author>
 <rights type="text">Copyright © {{ site.time | date: "%Y" }} {{ site.author }}. All rights reserved.</rights>

 {% for post in site.posts %}
 <entry>
   <title>{{ post.title }}</title>
   <link rel="alternate" href="{{ site.url }}{{ post.url }}"/>
   <updated>{{ post.date | date_to_xmlschema }}</updated>
   <id>{{ site.url }}{{ site.baseurl }}{{ post.id }}</id>
   <summary>{{ post.description }}</summary>
   <content type="html">{{ post.content | xml_escape }}</content>
 </entry>
 {% endfor %}

</feed>
Note on YAML Front Matter block: It’s important to leave the dashes at the top of the file. This is necessary because Jekyll will not process a page with Liquid unless there is a YAML block at the top of the file.
Enable auto-discovery: Make sure you add the appropriate meta tag to support automated discovery of your feed. Place the following code somewhere in your template’s <head> section to output the necessary metadata:
<link type="application/atom+xml" rel="alternate" href="{{ site.url }}/feed.xml" title="{{ site.title }}" />
Create the XSL file to style the feed
We can use XSLT to style our XML. This makes our feeds more human-readable while supporting bots, aggregators, and search engines.
You’ll notice some similarities to HTML and CSS in the example below, but with a few semantic changes and special attributes.
First, you can place your CSS in the <style> tag like normal. You can also use some standard HTML markup like the <body>, <section>, <p>, and <h1> tags.
There are a few special elements you can use, like <xsl:apply-templates> or <xsl:value-of>. I won’t cover these in detail during this tutorial, but W3Schools maintains a great XSLT reference if you want to learn about all these special elements.
This Github Gist shows an example of the XLST stylesheet I created for my website. I wrote some basic CSS styles to format it, but you could even tap into your site’s primary CSS file to keep the styling consistent.
Save your file as feed.xsl and add the tag below to your XML file. Make sure the href tag points to the correct location and file name for your website.
<?xml-stylesheet href="/feed.xsl" type="text/xsl"?>
Conclusion
With a little extra care and attention, we can improve the experience of using RSS and Atom feeds across the web. Now when you visit my feed, you are greeted with an explanation of how to get started and a formatted recap of my latest posts.
I made my own XML template and XSLT stylesheet based on the examples above. You can see it in action here or download a version to adapt for your website.
Thanks for reading!